Setup Archlinux with BTRFS
As a huge ArchLinux fan, I have been trying to migrate from Debian to Arch since a long time. The only thing that bothers me is its stability. Thus, many workaround exist nowadays to get over the unstability of a rolling release system and one of them is backing up data. But backups software and methods are plenty and it can easily be overwhelming to pick one. So I looked for a seamless solution that can integrate deeply into my operating system. My idea was to have a special way to backup my system and only my system only, localy, to be able to revert to it at anytime in case it break without internet and/or eventually with a simple small USB stick.
Obviously a cloud solution to backup this would be horrible and rsync takes to much time and is not the best tool for saving a rolling release system that broke after an update as it is doing full backups, so I tried to find a snapshot based solution.
Make sure to go through the whole article before taking any action, you may want to take different decisions in function of your needs and hardware configuration
BTFRS explained
This is where I discovered BTRFS (standing for Btree File System, read it as ‘Better.F.S’), a COW (Copy-On-Write) filesystem compatible with btrees.
From the cow to the tree
In computer science, the COW concept allow multiple processes to have access to the same ressource simultanely unless one process modifies it. In such case, a private copy of this ressource is created instead of copying ressources in the very beginning. Here’s an example for my C++ folks since C++ implemented COW on their strings:
std::string x("I love");

std::string y = x;  // x and y use the same buffer.

y += " Pineapples";    // Now y uses a different buffer; x still uses the same old buffer.
From a security standpoint, the major vulnerability on the Linux kernel “Dirty COW” comes from here.
On the other hand, a btree is a tree data structure respecting the following properties:
- Every node has at most m children
- Every node has has at least [m/2] children, except the root node
- The root node has 2 children unless it is a leaf
- All leaves appear on the same level
- A non-leaf node with k children contains k-1 keys
Pros and cons
BTRFS was designed with those 2 cores principles in mind and is supposed to be the successor of the usual Linux File System (ext4). BTRFS allow shrinking onlines volumes, fast checksum computing etc. But the neat part is in snapshot mechanism, perfect for backups, a snapshot can be done with online disk while files are modified. You can also snapshot your full volume, getting it back by rebooting or getting back specific files from it only by mounting the snapshots as volumes. Snapshots are also optimized to take the less possible space on the disks as it is only a difference from modified files.
Although BTRFS also comes with drawbacks which are the lack of encryption volumes (as of today this is something that is planned to be implemented), the under performances in terms of input/output of the disk compared to ext4, the fact that it is still considered as unstable even though it has been around for years and has proven its reliability. But as BTFRS is still under development, this may change in the future.
As for my needs, I really need an optimized way of rollbacking my Arch Linux operating system. If this filesystem is marked as unstable and have a slight chance to break but allow me to mostly rollback my system when it breaks, that means less full Archlinux reinstall and reconfiguration. Plus, it is still possible to have a separate encrypted partition/disk with ext4 for your home directory with your personnal stuff and your config files. So we are only talking here about disposable files required for an OS to work.
Note: the performances issues are hardly noticable and can be solved by making a RAID
Walkthrough
So today I will guide you through a full, manual install of Arch Linux with:
- BTRFS as a filesystem for the files
- A Swap partition on the same drive
- ext4 as a filesystem for my home directory in a different drive
- An xfce graphical Desktop
- Snapper tool to manage and schedules my snapshots
- Using systemd as a bootloader
All the work has been done within VirtualBox as a proof of concept with the idea to implement it with a dual boot on my desktop computer alonside with Windows.
This is not really a tutorial for beginner, I tried to break down every step in the beginning but I realized halfway that it would be too long to read so I had to speed up the process and stop showing screenshots or going into deep deep details. If you have any issue or question, the Arch wiki is your go-to.
Arch Linux team often slightly change their wiki or installation process so you might have to refer to the wiki if you experience when trying to reproduce this walkthrough
Virtualbox setup
So pull your latest arch iso, create an empty VM on VirtualBox with a generic linux, a dynamic disk of 16 gigas to be large, and 3 to 4 giga of RAM, a single core should be enough for this exercice. Once it is done, add the arch ISO to your VM, don’t forget to set up another virtual disk to set it up as your home, you should have something like this:
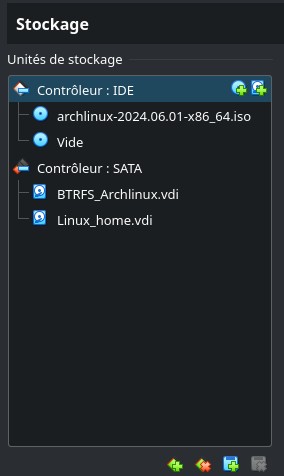
Also make sure that you have EFI enabled in the virtual machine configuration as we will be doing an EFI install.
After starting your virtual machine, you will eventually end up on ArchLinux boot screen so you can let it load the first entry.
Keyboard layout
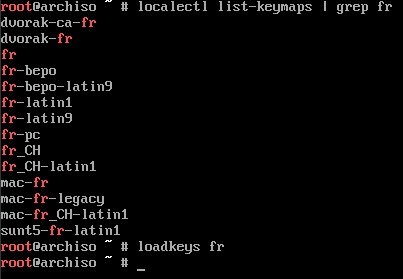
So the first thing to do when you install Arch Linux is to correctly set-up your keyboard layout. As I am running on an azerty keyboard, I will just load the French one but you can also look up for different configurations by typing:
root@archiso ~ # localectl list-keymaps
Do not hesitate to give it a little grep to filter out languages that you do not need
And then personnaly I will run:
root@archiso ~ # loadkeys fr
Networking
The second important thing to have on your installation is an internet connection. To check if you are connected you can just type
root@archiso ~ # ip a
And relevant informations will come to you such as an IP adress. If not, it might be because you have a wifi connection or you have to troubleshoot which is, in both case, outside of the scope of this article.
Syncing time
Once an internet connection is established, we can take advantage of the NTP protocol who will automaticaly set up the time for us.
root@archiso ~ # timedatectl set-ntp true
Getting closest mirrors
This step is optionnal but if you want to download packages faster you may be interested in. Arch Linux has a lot of mirrors all across the world reflecting packages so you won’t need to download packages from Australia when you are in Ireland for example. To find the nearest mirror we can go to the Arch wiki and ping them all to add the fastests on the mirror list… Or we can use a tool named reflector. This tool will do all the work for us over a single command. Let’s say I am in germany right now, so the command will be:
root@archiso ~ # reflector -c Germany --latest 200 --protocol https --sort rate --save /etc/pacman.d/mirrorlist
This will get me the 6 fastest mirrors around me and save them in the configuration directory of Pacman (the package manager).
You might get some warning as some server might not answer anymore because they experiences issues or they are no longer maintened. It should stop the process.
Afer theis step, synchronize pacman with a little
root@archiso ~ # pacman -Syy
Partitionning
This is an interesting part in our configuration. Start listing the disks using
lsblk
And you should see something like this:
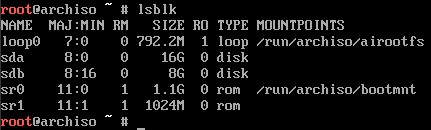
So we can clearly see here the 2 different devices, the 16GB one where we will install our system and a swap partition as well as our UEFI partition (since we are on a UEFI system), and the other 8GB one for the home, alonsgide the one required for our live Arch to be functionnal.
Let’s plan our paritions the following way:
- System device (16GB)
- UEFI partition(fat, 1GB)
- root filesystem partition (BTRFS, 14GB)
- Swap partition (Swap, 1GB)
- Home device (8GB)
- Home partition (ext4, 8GB)
Some people may want to put there home partition inside the root filesystem. As BTRFS4s main purpose is doing great snapshots, I do not consider it as a good option compared to a full backup (that I can do externally with cloud solutions or cold storage with rsync once in a while for example). That is why I chosen the reliability and high throughput of ext4 over BTRFS. Plus, having a home partition on a separate drive avoid bottleneck issues that our main drive can have as we are now taking advantage of having 2 disks going at there own pace, we can read files virtually faster by reading on 2 disks simultaneously. All your config files and personnal files will be read on the home disk while the system disk will be running on its own. Resulting in a more responsive, faster system overall. Finally if your system or your disk break, you can still replace it, doing a reinstall of Arch or another distro and still having all your data in the home disk.
That said if you only have one disk or still want to put your home inside the same disk, you can follow this article by applying the same commands to home as we did for the snapshot subvolume. Or you can partition your home directory as ext4 on your system disk next to the swap.
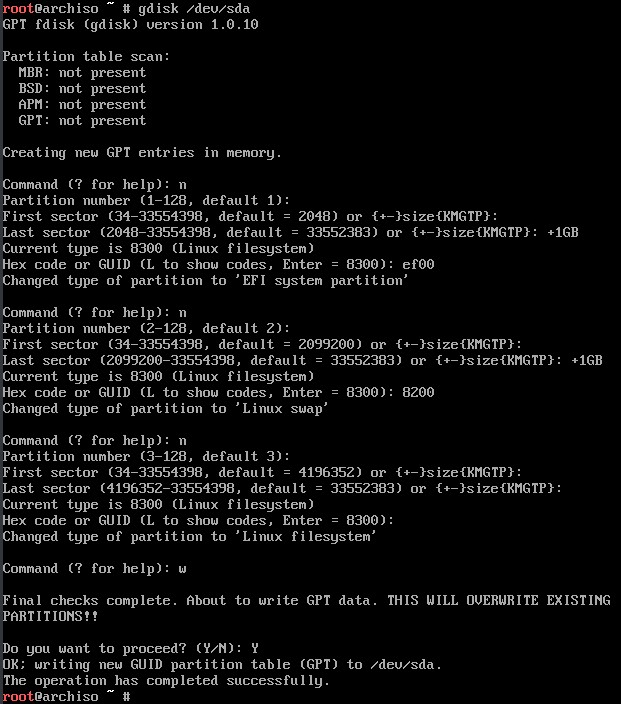
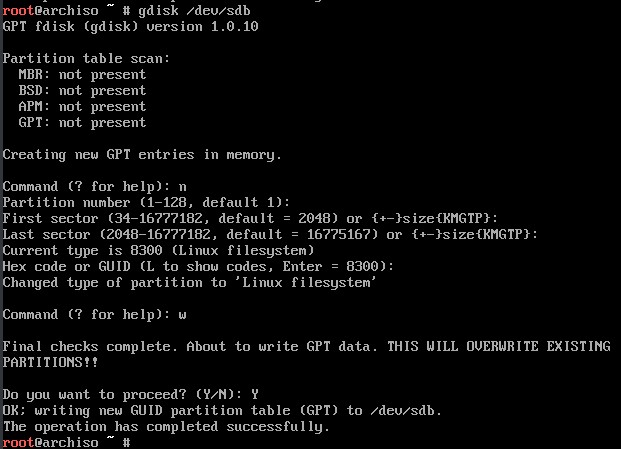
We will be using gdisk as an interactive tool for formating our drives, as for me, sda is my system device so:
root@archiso ~ # gdisk /dev/sda
Then we will type n for a new partition. Let’s use this partition as number 1. You can let the first block as it is by default but the last block is going to be 1GB later, so you can type +1GB and let gdisk will do the math for you. You will be asked for an Hex code or GUID and the code for the UEFI partition is ef00 then hit enter.
We can also go through the same process with the swap partition except the GUID code is 8200
Finally we can create the last partition to take up all the space let by using all the default values and type w to write changes to the disk then Y to confirm. Here is what it should look like.
Then let’s do the same with our home disk, by simply creat one huge partition taking up the entire disk:
Formating
If you look up at lsblk now, you will see a tree of the partition under each devices.
Once we have all our partitions, we can start formating them the way we want.
UEFI
root@archiso ~ # mkfs.fat -F32 /dev/sda1
The F32 argument is to make a FAT32 partition.
Swap
root@archiso ~ # mkswap /dev/sda2
swapon /dev/sda2
The first command is to format, and the second is to enable it.
Root filesystem
root@archiso ~ # mkfs.btrfs /dev/sda3
Home partition
root@archiso ~ # mkfs.ext4 /dev/sdb1
Notice here that we use sdb because it is a different disk.
Mounting
BTRFS
Now, we need to mount all those partition (except the swap) into the system file, but BTRFS is requiring a little more extra work because you actually have to create subvolumes. Let’s first mount sda3:
root@archiso ~ # mount /dev/sda3 /mnt
Then we will use sda3 into 2 subvolumes: the root one and another one for snapshots.
root@archiso ~ # btrfs su cr /mnt/@
”@” means the root of the filesystem, Snapper will create the snapshot subvolume and its mountpoint for us
After that, we need to unmount the partitions to mount them in a specific configuration that BTFRS allow
mount -o noatime,compress=lzo,space_cache=v2,subvol=@ /dev/sda3 /mnt
Let’s break it down:
- noatime: Improve performances because no new access time needs to be written
- compress=lzo: Use specific algorithm for compression, I am going with lzo but you can check others
- space_cache: Also improve performances by taking advantages of spaces cache, the v2 allow to have the same perfomances on larger disks whereas v1 has some issues on that
- subvol: Point to the path of the specific subvolume where to apply this configuration Now that the partition is mounted, we can create mountpoints for the other partitions
root@archiso ~ # mkdir -p /mnt/{home,boot}
Boot and Home
And the home and boot partitions, as they are not BTRFS partition they can simply be mounted by:
root@archiso ~ # mount /dev/sdb1 /mnt/home
root@archiso ~ # mount /dev/sda1 mnt/boot
Installing the system
After those steps, we will download and install the system into the root partition:
root@archiso ~ # pacstrap /mnt base linux linux-firmware nano intel-ucode base-devel
Depending on your internet connection you might want to grab a coffee
Here’s a quick summary of all the packets installed:
- linux: is the base system
- linux-firmware: is a package containing binaries to interact with the hardware
- nano: is a small text editor, you can use vim also but we will need to edit files anyway
- intel-ucode: is a package containing firmware relative to your processor, use amd-ucode if you have an amd processor
- base-devel: is a package containing a set of tools for development purpose, not really useful a the moment but that is more a personnal preference to have it right now
fstab
We need to save this mounting configuration now, and for that we will use fstab:
root@archiso ~ # genfstab -U /mnt >> /mnt/etc/fstab
Now you can see your configuration and confirm it by typing
root@archiso ~ # cat /mnt/etc/fstab
Chrooting
As of now, we are using the live version of Arch Linux. It is now time for us to switch into the Arch Linux we created in the drives, for this we will CHange ROOT using this command:
root@archiso ~ # arch-chroot /mnt
Timezone
As we are in our brand new Arch Linux, we have to define our location for the timezone. This is done by defining a symbolic link between an arbitrary chosen timezone in /usr/share/zoneinfo/[REGION]/[CITY] into /etc/localtime. But before you may need to know which timezone is available, so just start typing:
[root@archiso /]# ln -sf /usr/share/zoneinfo/
And hit tab twice to see Which region you are in, from here you can navigate to this region and select the right city.
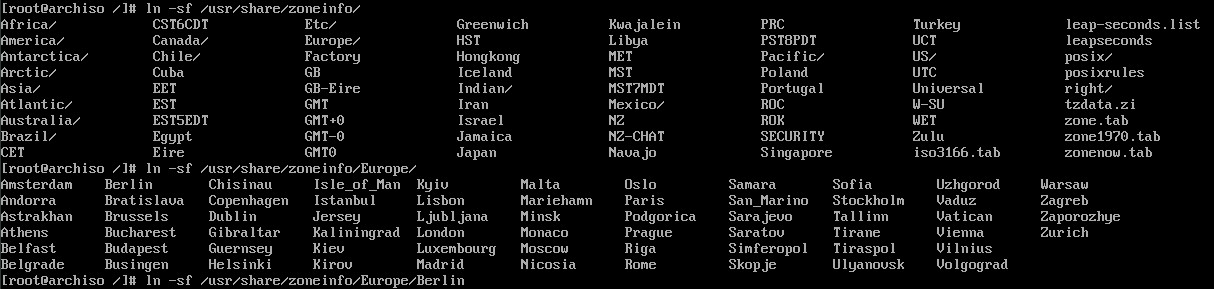
You can finish typing the command by adding the destination:
[root@archiso /]# ln -sf /usr/share/zoneinfo/Europe/Berlin /etc/localtime
And we need to synchronize the hardware clock with the system clock that we just set up.
[root@archiso /]# hwclock --systohc
Locale
We also need to define our locales which are used by programs running on top of Arch to render things relative to what you set them on such as currency, special characters, date formats etc.
[root@archiso /]# nano /etc/locale.gen
From here you will see all different sort of locales starting by a #, means there are commented, you need to uncomment the right one. For me I will uncomment the line fr_FR.UTF-8 UTF-8 but you can uncomment the one according to your needs. If you don’t know, you can just go with your country code followed by the UTF-8 format if possible. For nano save with CTRL+O, ENTER then CTRL+X to quit. If you installed vim just turn off your computer.
Once it is done, we can generate our locales the following way
[root@archiso /]# locale-gen
Now let’s just write our locale into our locale conf. Some people are writing them by editing the file and remembering the name of the locale but I am lazy about it and it is can lead to typo errors so we can quickly take advantage of some shell command:
[root@archiso /]# echo "LANG=$(cat /etc/locale.gen | grep -v "#" | cut -d " " -f 1)" >> /etc/locale.conf
This command will take our /etc/locale.gen file, filter it by taking all the uncommented lines, prepending LANG= to it and appending the result to the locale config file (creating it on the fly if it is not).
Because of my different keyboard layout, I have to also write a vconsole file where I will put it (I am refering to the loadkeys we did in the first step). This will allow to create a persistent keymapping read by systemd while booting
[root@archiso /]# echo "KEYMAP=fr" >> /etc/vconsole.conf
Networking (again)
You can set up your hostname machine this way, I am going to name my machine “Archlinux_VM”:
[root@archiso /]# echo "Archlinux_VM" > /etc/hostname
And we also have to write in the host file to configure the loopbacks and the aliases. You can use nano again but I will demonstrate that it is also doable within a single command using printf as we need to write over multiple lines with carriage return character \n.
[root@archiso /]# printf "127.0.0.1 localhost\n::1 localhost\n127.0.1.1 Archlinux_VM.localdomain Archlinux_VM\n" >> /etc/hosts
You can use tabs or 4 spaces between IP and names, however try to be consistent and do not forget the last carriage return with printf
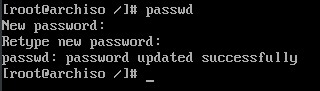
Root password
Set up root password with the following command:
[root@archiso /]# passwd
A prompt will ask you the passwor without writing anything to the terminal, it is made to ensure your password doesn4t end up logged in the bash history. Just type your password and confirm it.
Installing bootloader
As told above, I will be using grub. I use to go with systemd-boot but there is some incompatibility issues with BTRFS for now.
We will install the bootloader using:
[root@archiso /]# pacman -Sy grub efibootmgr
[root@archiso /]# grub-install --target=x86_64-efi --efi-directory=boot --bootloader-id=GRUB
[root@archiso /]# grub-mkconfig -o /boot/grub/grub.cfg
Installing some more packages
Now to be up and running we will need some more packages:
[root@archiso /]# pacman -Sy networkmanager network-manager-applet inetutils dialog mtools dosfstool git reflector snapper xdg-utils xdg-user-dirs alsa-utils pulseaudio linux-headers sudo rsync
So,
- networkmanager, network-manager-applet, inetutils: network related packages
- mtools, dosfstool: for dealing with fat filesystem
- xdg-utils, xdg-user-dirs: for a better desktop integration
- alsa-utils, pulseaudio: sound related packages
- linux-headers: files needed for interact with the kernel when programming
- dialog: script related package
- git: versionning tool
- reflector: We used it before
- snapper: for managing snapshots
- sudo: to manage rights as root
- rsync: syncing tool for backing up boot (see below)
mkinitcpio
During the early boot process, the mkinicpio script is ran to load requied modules for the hole system to start. I am not going to explain how Linux is booting in this article but keep in mind that we have to include the btrfs module in this script so the filesystem will be recognized when booting
[root@archiso /]# nano /etc/mkinitcpio.conf
Find the line MODULES=() and replace it by MODULES=(btrfs). Save, exit and regenerate the image required in the init boot process by typing:
[root@archiso /]# mkinitcpio -p linux
Enabling NetworkManager
We installed NetworkManager but it is not starting by default when booting. Let’s fix that.
[root@archiso /]# systemctl enable NetworkManager
Add user
Our system need a basic user other than root for daily usage. I am going to name mine “rmi78” and adding it to the wheel group:
[root@archiso /]# useradd -mG wheel rmi78
And adjust the password, same as we did for the root password
[root@archiso /]# passwd rmi78
Then we need to give sudo right to this user, but let’s give it to the group as it can be easier to manage afterward.
if you use nano:
[root@archiso /]# EDITOR=nano visudo
if you use vim just:
[root@archiso /]# visudo
In the file, you can uncomment the first line about the wheel group: %wheel ALL=(ALL:ALL) ALL
Rebooting
We are done with installing from the live version and we can finally reboot to our fesh installed Arch Linux. Let’s unmount all the volumes and reboot.
[root@archiso /]# umount -a
[root@archiso /]# reboot
When rebooting, you will be granted with the Grub boot menu, you can select Arch Linux then login
after login, try to ping an adress and type
ip ato make sure you have internet connection. If not, you may want to restart NetworkManager by usingsudo systemctl restart NetworkManager. The commandnmtuimay also help setup your internet connection.
Configuring snapper
For the defqult configuration:
[rmi78@archiso ~]# sudo snapper -c root create-config /
We could have been skipping creating our snapshot subvolume in the first place but then we would have to deal with regenerating the fstab file
Now, we can change the properties of the snapshot mountpount and edit the snapper config file by doing:
[rmi78@archiso ~]# sudo chmod 750 /.snapshots
[rmi78@archiso ~]# sudo nano /etc/snapper/configs/root
It is important to replace the line ALLOW_USER="" by including your own user, for example, to me it will be ALLOW_USER="rmi78"
The second thing to do in this config file is to setup how many times you can to create your snapshots, you will see by defaults values like this:
TIMELINE_MIN_AGE="3600"
TIMELINE_LIMIT_HOURLY="10"
TIMELINE_LIMIT_DAYLY="10"
TIMELINE_LIMIT_WEEKLY="0"
TIMELINE_LIMIT_MONTHLY="10"
TIMELINE_LIMIT_YEARLY="10"
It is recommended for performances to have the following configuration:
TIMELINE_MIN_AGE="1800"
TIMELINE_LIMIT_HOURLY="5"
TIMELINE_LIMIT_DAYLY="7"
TIMELINE_LIMIT_WEEKLY="0"
TIMELINE_LIMIT_MONTHLY="0"
TIMELINE_LIMIT_YEARLY="0"
I will follow this recommandation but it is up to you. With this configuration, you will always have recent snapshots of your partition to rollback on and will not rely on older ones in case something break.
After that, we need to enable the snapper deamons.
[rmi78@archiso ~]# sudo systemctl enable --now snapper-timeline.timer
[rmi78@archiso ~]# sudo systemctl enable --now snapper-cleanup.timer
AUR
This step is not necessary but I will install yay on my machine to take advantage from the Arch User Repository
[rmi78@archiso ~]# git clone https://aur.archlinux.org/yay
[rmi78@archiso ~]# cd yay/
[rmi78@archiso yay]# makepkg -si PKGBUILD
Confirm and let it build.
AUR is helpful because it has a couple of scripts that will improve the experience of snapper such as a GUI and a script writing our snapshots as entries in grub. This way if our system fail to boot, we can still boot from a snapshot.
[rmi78@archiso ~]# yay -S snap-pac-grub snapper-gui
Then you can follow the installation process.
GUI
We can finally setup a desktop environment, as said I will go with xfce and gdm.
[rmi78@archiso ~]# sudo pacman -Sy xorg xfce4 xfce4-goodies gdm
[rmi78@archiso ~]# sudo systemctl enable gdm
[rmi78@archiso ~]# localctl set-keymap fr
[rmi78@archiso ~]# localctl set-x11-keymap fr
This will download and install the xorg windows manager alongside with the gdm (Gnome Desktop Manager) and the default xfce desktop environment. If you are already experimented with installing user interfaces, you can put your favorite one here.
The 2 last commands will set the right keyboard layout as french for x11 and gdm. You can go by your own layout here according to the one listed in the first step.
Auto backup for boot
A nice thing to think about is also to keep a backup of your boot partition to keep your system resilient so you can format and reinstall it from a live usb if anything goes wrong. But remember that the /boot partition is in FAT32 format, not BTRFS. We can workaround by making a small rsync backup of this partition inside our root partition, and automate it nicely with a pacman hook. So each time a package is changed thanks to pacman, either it is an installation, and update or a removal, rsync will update the boot backup.
sudo mkdir /etc/pacman.d/hooks
sudo nano /etc/pacman.d/hooks/bootbackup.hook
And we will write the following hook in this file:
[Trigger]
Operation = Upgrade
Operation = Install
Operation = Remove
Type = Path
Target = boot/*

[Action]
Depends = rsync
Description = Backing up /boot...
When = PreTransaction
Exec = /usr/bin/rsync -a --delete /boot /.bootbackup
Then we can edit the pacman configuration file to enable the hooks directory we put our hook in:
sudo nano /etc/pacman.conf
Finally uncomment the HookDir directive where /etc/pacman.d/hooks/ is the default directory
You can now reboot into a fully functionnal system with a graphical interface (you may need to install basic tools such as firefox and vlc).
Conclusion
From now on, you can start Snapper-gui as root to retrieve your files.
You can also boot from a readonly snapshot from the grub bootloader in case your Arch breaks but it require you to install a package called grub-btrfs, and add grub-btfrs-overlayfs to the HOOK line. And regenerate the image using the same command in mkinitcpio.
It was my tutorial into mounting a fully functionnal and resilient Archlinux with BTRFS for easy snapshots. Hope you liked it ! Huge credit to the Archlinux Wiki that I could have quoted everywhere.